How to Install Apache on CentOS 7
Apache is an open-source web server that can be configured to serve a single or multiple websites using the same Linode. This guide explains how to install and configure the Apache web server on CentOS 7.
This guide is written for a root user.
Replace each instance of example.com in this guide with your site’s domain name.
To check your hostname run:
# hostname
Within the conf.d directory create vhost.conf to store your virtual host configurations. The example below is a template for website example.com; change the necessary values for your domain:
Note: ErrorLog and CustomLog entries are suggested for more specific logging, but are not required. If they are defined (as shown above), the logs directories must be created before you restart Apache.

# firewall-cmd --add-service=http --permanent && sudo firewall-cmd --add-service=https --permanent
This guide is written for a root user.
Replace each instance of example.com in this guide with your site’s domain name.
Before You Begin
Ensure that you have followed the Getting Started and Securing Your Server guides, and the hostname is set.To check your hostname run:
# hostname
# hostname -f
The first command should show your short hostname, and the second should show your Fully Qualified Domain Name (FQDN).
Modify httpd.conf with your document root directory to point Apache to your site’s files. Add the <IfModule prefork.c> section below to adjust the resource use settings. The settings shown below are a good starting point for a 2GB:
Before changing any configuration files, we recommend that you make a backup of the file. To make a backup:
# cp /etc/httpd/conf/httpd.conf ~/httpd.conf.backup
# vi /etc/httpd/conf/httpd.conf
These settings can also be added to a separate file. The file must be located in the conf.module.d or conf directories, and must end in .conf, since this is the format of files included in the resulting configuration.
The first command should show your short hostname, and the second should show your Fully Qualified Domain Name (FQDN).
Update your system:
# sudo su -
# yum update
Install and Configure Apache
# yum install httpdModify httpd.conf with your document root directory to point Apache to your site’s files. Add the <IfModule prefork.c> section below to adjust the resource use settings. The settings shown below are a good starting point for a 2GB:
Before changing any configuration files, we recommend that you make a backup of the file. To make a backup:
# cp /etc/httpd/conf/httpd.conf ~/httpd.conf.backup
# vi /etc/httpd/conf/httpd.conf
DocumentRoot "/var/www/html/example.com/public_html"

...

<IfModule prefork.c>
    StartServers        5
    MinSpareServers     20
    MaxSpareServers     40
    MaxRequestWorkers   256
    MaxConnectionsPerChild 5500
</IfModule>
...
These settings can also be added to a separate file. The file must be located in the conf.module.d or conf directories, and must end in .conf, since this is the format of files included in the resulting configuration.
Configure Name-based Virtual Hosts.
You can choose many ways to set up a virtual host. In this section we recommend and explain one of the easier methods.Within the conf.d directory create vhost.conf to store your virtual host configurations. The example below is a template for website example.com; change the necessary values for your domain:
# vi /etc/httpd/conf.d/vhost.conf
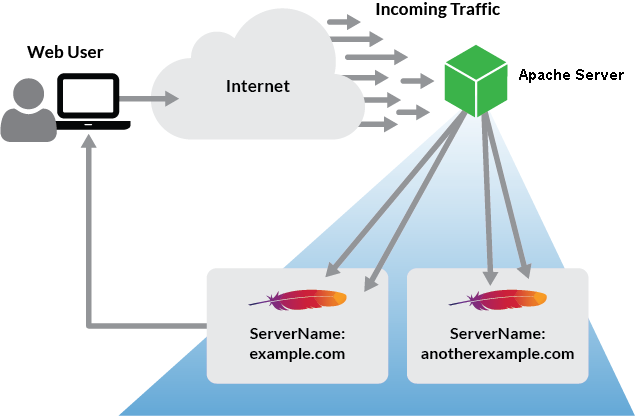
Additional domains can be added to the vhost.conf file as needed. To add domains, copy the VirtualHost block above and modify its values for each additional virtual host. When new requests come in from the internet, Apache checks which VirtualHost block matches the requested url, and serves the appropriate content:
NameVirtualHost *:80

<VirtualHost *:80>
    ServerAdmin webmaster@example.com
    ServerName example.com
    ServerAlias www.example.com
    DocumentRoot /var/www/html/example.com/public_html/
    ErrorLog /var/www/html/example.com/logs/error.log
    CustomLog /var/www/html/example.com/logs/access.log combined
</VirtualHost>
Additional domains can be added to the vhost.conf file as needed. To add domains, copy the VirtualHost block above and modify its values for each additional virtual host. When new requests come in from the internet, Apache checks which VirtualHost block matches the requested url, and serves the appropriate content:

Create the directories referenced above:
# mkdir -p /var/www/html/example.com/{public_html,logs}
Enable Apache to start at boot, and restart the service for the above changes to take effect:
# systemctl enable httpd.service
Enable Apache to start at boot, and restart the service for the above changes to take effect:
# systemctl enable httpd.service
# systemctl restart httpd.service
You can now visit your domain to test the Apache server. A default Apache page will be visible if no index page is found in your Document Root as declared in /etc/httpd/conf/httpd.conf:
You can now visit your domain to test the Apache server. A default Apache page will be visible if no index page is found in your Document Root as declared in /etc/httpd/conf/httpd.conf:

Configure firewalld to Allow Web Traffic
CentOS 7’s built-in firewall is set to block web traffic by default. Run the following commands to allow web traffic:# firewall-cmd --add-service=http --permanent && sudo firewall-cmd --add-service=https --permanent
# systemctl restart firewalld


Comments
Post a Comment