Posts

Showing posts from February, 2017

How to install LDAP on CentOS 7

Image
Introduction LDAP stands for Lightweight Directory Access Protocol  and, as the name suggests, it’s a standard protocol for accessing and maintaining distributed directory information services over an IP network. In this tutorial, we’ll install a LDAP server on Centos 7 using 389 Directory Server. Getting started First of all,  configure FQDN in /etc/hosts . In that file, put the server’s fully qualified domain name. 127.0.0.1 localhost localhost.localdomain localhost4 localhost4.localdomain4 ::1 localhost localhost.localdomain localhost6 localhost6.localdomain6 X.X.X.X yoursever.hostname.lan server Of course, substitue the last line in this example with your server’s informations. Configure firewall As you may know, we need to allow LDAP server’s default ports via firewall in order to access it from a remote system. So: firewall-cmd --permanent --add-port=389/tcp firewall-cmd --permanent --add-port=636/tcp firewall-cmd --permanent --add-port=9830/tcp Now, resta

Install and configure Jenkins on Ubuntu 16.04

Image
Introduction Jenkins  is an automation server written in Java, as a fork of the  Hudson  project. It helps to automate part of the software development process, with aids like continuous integration, but also by further empowering teams to implement the technical part of a Continuous Delivery.  Jenkins  supports many SCM (Source Control Management) software systems including  Git ,  SVN , and  Mercurial  and provides hundreds of plugins to automate projects. This tutorial explains how to install and use Jenkins on Ubuntu 16.04 using Apache as server . Install Java Jenkins  requires Java, so, install  OpenJDK7  on the server. First, install  python-software-properties : # apt install python-software-properties Then you can add Java repository: # add-apt-repository ppa:openjdk-r/ppa Update Ubuntu repos and install OpenJDK: # apt update # apt install openjdk-7-jdk Run  $ java -version  to verify that you have OpenJDK7 correctly installed. Install Jenkins Jenkins team

How to generate and check strong passwords in Linux

Image
Introduction Different operations require different security layers. Accessing your email account, your social media, your bank account, and a remote server that you administer through SSH all need different security layers, and contain data which hold different “weight”. But, in order to accessing all these operations, you will always require the same thing:  a password . We all know that a strong password is what you really need in order to be protected from attacks, and, of course, we all know that it’s better to use different passwords for different services. A very unwise decision (and common mistake) would be using your server password to access Facebook. This decision could cause you lots of trouble. So how can we easily manage the task of creating strong passwords? In this tutorial, we will talk about how to generate and check your passwords . Generate a strong password A strong password should be composed of a mix of alphabet characters, numbers, and symbols. A second

Encrypt your Apache Web Server on CentOS 7

Image
Introduction It was September when, with a  post on its blog , Google announced that starting from Chrome 56, its browser will mark non-secure pages containing password and credit card input fields as  Not Secure  in the URL bar. It’s important to note that we are talking about  all HTTP pages  collecting users’ “critical” data. This move is part of a long-term plan to mark all HTTP sites as non-secure. So, if you own (or manage) a web server, you need to make the right move:this article this will explain just what that means. Why HTTPS? The first question is: why is Google doing this? What are the concerns around HTTP, and why, today, is it a good choice to secure connections? Of course, everybody knows that secure is better then insecure; but in this case, the big problem with HTTP is that it lacks a system for protecting communications between clients and servers. This exposes data to different kinds of attacks, for instance, the “Man in the middle” (MIM), in which t

Build a LAMP stack (Linux, Apache, MySQL, PHP) - CentOS 7

Image
To build a dynamic web application, you need what has been coined a “stack” - which is developer lingo for an integrated set of software that has all of the components your application needs. Most stacks have the same types of components and differ mainly in which pieces of software they use for those components. For example, we’ll look at LAMP (which this article covers): LAMP Software: Linux (e.g. CentOS), Apache, MySQL, PHP If you're astute, maybe you noticed that LAMP is just an acronym for the software the stack uses. In this guide, we'll walk you through installing all of these components (except for Linux, which is already installed as your OS when you create the server). Install Apache Before you begin any installation, make sure that your software is up to date: # sudo yum update Install Apache: # sudo yum install httpd Start Apache: # sudo systemctl start httpd.service Set Apache to start on server b

SSL Certificates with Apache on CentOS 7

This guide will show you how to enable SSL to secure websites served through Apache on CentOS or Fedora. Before You Begin This guide assumes that you are running Apache2 on CentOS or Fedora. Prior to starting this guide, ensure that the following steps have been taken on your Linode: Familiarize yourself with our Getting Started guide and complete the steps for setting your hostname and timezone. In order to configure your Apache server to function with SSL, you will need to ensure that the Apache mod_ssl module is installed on your system. You can do so by running the following command:           # yum install mod_ss Configure Apache to use the SSL Certificate Edit the virtual host entries in the /etc/httpd/conf.d/ssl.conf file to include the certificate files and virtual host information that should be used by each domain. For each virtual host, replicate the configuration shown below. Replace each mention of example.com with your own domain. If you’

How to Install Apache on CentOS 7

Image
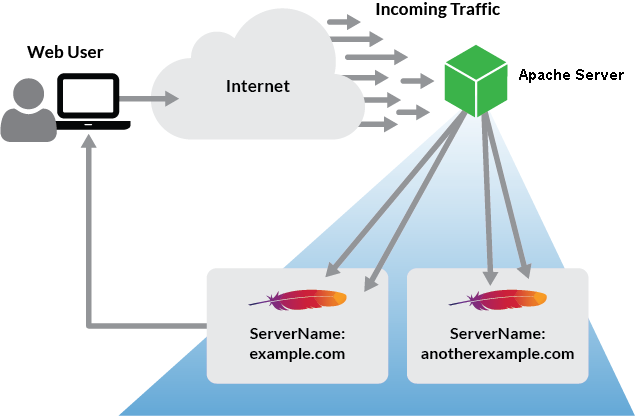
Apache is an open-source web server that can be configured to serve a single or multiple websites using the same Linode. This guide explains how to install and configure the Apache web server on CentOS 7. This guide is written for a root user. Replace each instance of example.com in this guide with your site’s domain name.  Before You Begin Ensure that you have followed the Getting Started and Securing Your Server guides, and the hostname is set. To check your hostname run: # hostname # hostname -f The first command should show your short hostname, and the second should show your Fully Qualified Domain Name (FQDN). Update your system: # sudo su - # yum update Install and Configure Apache # yum install httpd Modify httpd.conf with your document root directory to point Apache to your site’s files. Add the <IfModule prefork.c> section below to adjust the resource use settings. The settings shown below are a good starting point for a 2GB: Before chang

Install MySQL 5.7 on CentOS/RHEL 7.3/6.8/5.11

Image
MySQL is a relational database management system (RDBMS) that runs as a server providing multi-user access to a number of databases. This is guide,  howto install or upgrade MySQL Community Server latest version 5.7 (5.7.17) on CentOS 7.3/6.8/5.11 and Red Hat (RHEL) 7.3/6.8/5.11 . This guide works of course with  Oracle Linux  and  Scientific Linux  too and MySQL 5.6/5.5 installation is possible too. Note: If you are upgrading MySQL (from earlier version), then make sure that you backup (dump and copy) your database and configs. And remember run  mysql_upgrade  command. 1. Install MySQL Database 5.7.17 on Fedora 25/24/23, CentOS 7.3/6.8/5.11, Red Hat (RHEL)7.3/6.8/5.111. Change root user su - ## OR ## sudo su - 2. Install MySQL YUM repository. # CentOS 7 and Red Hat (RHEL) 7 # # yum localinstall https://dev.mysql.com/get/mysql57-community-release-el7-9.noarch.rpm  # CentOS 6 and Red Hat (RHEL) 6 # # yum localinstall https://dev.mysql.com/get/mysql57-community-

How to install Tomcat 8.5 on Debian 8

Image
Introduction Apache Tomcat  is a Java Servlet Container which implements several Java EE specifications including JavaServer Pages (JSP), Java Servlet, WebSocket and Java EL. It  also provides an HTTP web server environment in which Java code can run. It’s distributed under the Apache License 2.0. This tutorial explains how to install and configure  Tomcat 8.5.11 on Debian 8 . Getting started Install  Java The first thing to do is to install  python-software-properties , for managing repository: # apt install python-software-properties -y Next, add required repository: # echo "deb http://ppa.launchpad.net/webupd8team/java/ubuntu xenial main" | tee /etc/apt/sources.list.d/webupd8team-java.list # echo "deb-src http://ppa.launchpad.net/webupd8team/java/ubuntu xenial main" | tee -a /etc/apt/sources.list.d/webupd8team-java.list # apt-key adv --keyserver hkp://keyserver.ubuntu.com:80 --recv-keys EEA14886 # apt update Now, you can install  Java : # a